Why do I need to assign a device?
The device should be assigned to a user or resource prior to connecting it to your network to ensure that the device can be configured and will function properly. If the device is connected to the network before it is assigned, the device must be rebooted after the assignment.
A device must be assigned to a user or resource before that device can be fully managed in Elevate and before it can place and receive calls. Some configuration options for the device will not appear in CONTROL PANEL until the device has been assigned.
Important: each user should have no more than 5 devices assigned, including Elevate Desktop and Mobile applications. If there are more, it will cause registration and other issues.
Assigning A Device
To assign a device ordered from Company to a user, follow the steps below:
- Go to Services > Elevate > Devices > click on the name of the device you want to assign (matching MAC / Serial Number of the device)

- On the General tab, select the Assign user & edit e-911 location link.
- Select the user the devices will be assigned to
- Verify the address information which will be provided to emergency services for calls from this device. Update address information as needed.
- Be sure to check the I have read and understood the 911 Policy and limitations box
- Click Assign User button to complete the device assignment
Managing devices
To manage the devices assigned to the user or assign a new device, navigate to the Devices tab.
Important: each user should have no more than 5 devices assigned, including Elevate Desktop and Mobile applications. If there are more, it will cause registration and other issues.

Managing existing devices
Time Zones
In order to adjust the time zone for the device, follow the steps below:
- Go to Services > Elevate > Devices;
- Select the device you would like to manage;
- Find the Time zone section under the General tab;
- Select the desired time zone;
- Click Save changes at the bottom of the page.
Note: timezone configuration is unique for each phone and it will disrespect the timezone settings specified under User settings.
Audio
In order to change the codecs priority:
- Go to Services > Elevate > Devices;
- Select the device you would like to manage;
- Find the Audio section under the General tab
Here you can also manage audio security. Available options are No Encryption, TLS, and if there is a need to enable SRTP together with TLS for maintaining full compliance with a Secure SIP solution, Secure Voice:

To enable Secure SIP (SRTP together with TLS) for all devices on the account, go to Settings > General > Check the Secure SIP option.

Display
Display section suggests options to modify the phone's display. The phone screen can include 1-3 lines of information. The system will allow you to select one of the following options for each line: Username, company, text, extension, phone number.
The display settings can be adjusted here:
- Go to Services > Elevate > Devices;
- Select the device you would like to manage;
- Find the Display section under the General tab.
How to add Line keys
- Navigate to Services > Elevate > Devices > click on the name of the device.
- Click on the Line keys tab.
- You will see the number of line keys depending on your phone's model. Click on Action near the button you need to modify.
Note: you can not modify line key #1 as it is always assigned to the User of this phone.
You may choose the following options:
- Speed Dial
Provides one-button access to another location within your organization or an external phone number.
Speed dial can be set to immediately dial:- User
- User's Voicemail
- Auto Attendant
- Advanced Hunt Group
- Hunt Group
- Phone number
- Paging Group
- Custom
- This option is useful for:
- Users that frequently dial the same extensions or phone numbers.
- Users that frequently transfer callers to a specific User, Hunt Group (Basic or Advanced), Auto Attendant, or Resource.
Note: Speed Dial keys added from the Line Keys tab will display an asterisk (*) next to the extension (e.g. Matthew T.* or 105*); this signifies that the Speed Dial was added from the CONTROL PANEL UI
If you press the Remote Line Key on the phone then all outbound calls will be made from it by default. You will need to press line key 1 to dial out from your own extension.

- Hunt Group (Basic or Advanced) Login/Logout
This button allows the user to login to or log out from specific Hunt Group.
This option is useful for:- Users that are part of a Hunt Group and need to log in or out daily.

- Remote-line Key
Allows making and receiving phone calls on behalf of another User or Resource account. Internal calls will appear to be coming from this User. External calls will display the User’s caller ID. A device with a remote line key set up will receive calls simultaneously with the original device and they both will ring. You can set a display name for the Remote-line key for your device; this display name is only visible on the assigned device's screen and does not change the caller id name for internal extension dialing or external calls.
This option is useful for:- Running multiple businesses from your Elevate system; Remote-line key allows you to set up a button for each business on your phone to present the correct outbound caller ID when dialing out from the corresponding line key.
- When an assistant needs to place outbound calls on behalf of another employee.

- Busy Lamp Field
Displays the current status of another User’s phone, allows remote answering of calls ringing on the User’s phone and acts as a speed dial for that User.
This option is useful for:- Monitoring; to see when other Users are on phone calls (generally indicated by a red light on the line key, depending on the device)
- When an assistant needs to answer calls on behalf of another User

- BLF LED Mode
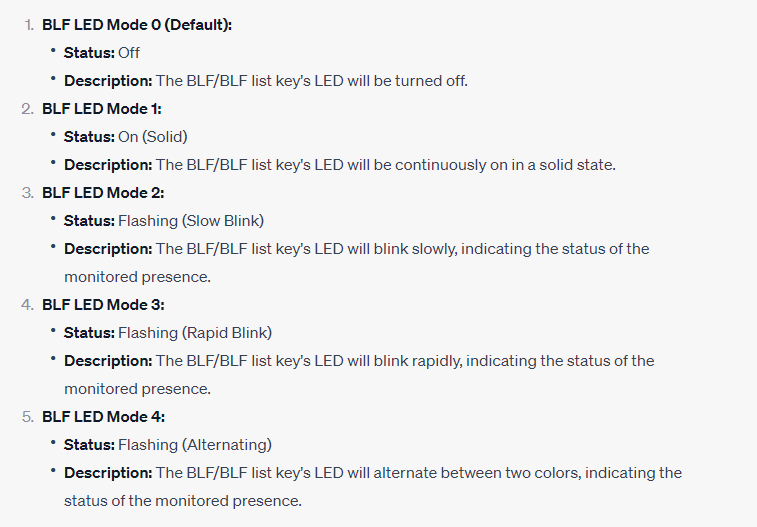 Note: To enable this feature contact support or raise an Extended Service Request with a custom phone parameter heading.
- Monitor Park Slot
Creates a line key that monitors a specific call park extension to alert you when a call is parked on that extension.
This option is useful for:- Monitoring; to see when a call is parked on a specific extension (generally indicated by a red light on the line key, depending on the device)
Note: call Park extension range depends on the account's set extension length. 3-digit accounts are 980 to 987 and 989; 4-digit accounts are 9980 to 9989; 5-digit accounts are 99980 to 99989 - Picking up calls; this key can also be used to pick up calls currently available in the park slot
- Monitoring; to see when a call is parked on a specific extension (generally indicated by a red light on the line key, depending on the device)

- Line Key Alias
Provide extra line capacity for making and receiving calls for the provisioned extension on this device.
This option is useful for:- Managing multiple inbound calls to a single extension or user device.

- Call pickup
Choose one of the following options:- From specific extension
- From specific Pickup Group
- Any company call
- From any Pickup Group

- Access code
Allows to program a line key to send a tone (DTMF) sequence during an active phone call. Dial sequence may include digits and special characters like pound (#), asterisk (*) for all phones and also a comma (,) for Poly and Yealink phones. You can set up a label which will be displayed on the phone.
- Park
Pre-programmed line key that dials #7 to park a call
- Record
Pre-programmed line key that dials #9 to start or stop call recording.

- Answer Page
Pre-programmed line key that dials *80 to turn a page into an intercom call
- Night mode
Pre-programmed line key that turns Night mode On/Off
4. Select an option, the user or resource to assign, and what should be shown on display of the phone. Click Save changes to confirm the key.
5. Once you're satisfied with your line key configuration, and all keys have been saved, click on Reboot device at the top of the page.