Managing Hunt Groups On Elevate
A Hunt Group is an automated service that helps with handling multiple inbound calls to your organization. When callers dial one of the phone numbers that are assigned to a Hunt Group, or are directed to the group from an Auto Attendant or User, the calls are automatically distributed to a group of agents who are prepared to answer calls.
Agents are user accounts that are assigned to a Hunt Group. Agents can be in any number of Hunt Groups simultaneously. A Hunt Group with a Ring All order can have no more than 35 agents, and in Hunt Groups with Round-Robin, Sequential, and Longest Idle ring types the number of agents is unlimited. Agents cannot change their own Hunt Group membership or Hunt Group settings.
Note: Always Forwarding and Busy Forwarding settings on the phones will not work properly with Simultaneous Hunt Groups. It's recommended to have them disabled.
In order to participate as a Hunt Group agent, a user must:
- Have voice services enabled.
- Be assigned to the Hunt Group as a member.
- Log in to the Hunt Group.
Note: you can create one Auto Attendant and 10 Hunt Groups for your account as part of your plan. You may create additional Auto Attendants and Hunt Groups for an additional charge.
Creating a Hunt Group
- Navigate to Services > Elevate > Groups.
- Click the Create group button.

- Enter the Hunt Group settings:
- Hunt Group Name: Choose an easily identifiable name for the group; for example, Sales or Customer Service.
- Extension: Type 3-6 digit extension that is not assigned to a user or Hunt Group.
- Email for voicemail: email address where voicemails directed to hunt group's built-in voicemail box will be sent
- Ringing Order: Choose how calls will be distributed across agents.
- Round-Robin: Sends the call to the first available agent in a list, starting the search from the next agent in a circular manner each time.
- Sequential: Sends the call to the first available agent in a list, starting from the top of the list each time.
Note: you can move agents up and down in the list to determine their routing priority when using round-robin and sequential ringing order. - Longest Idle: Sends the call to the available agent who has been off the phone the longest.
- Ring-All: Sends the call to all available agents simultaneously.
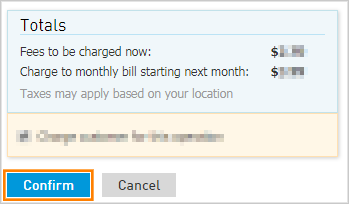
- Click the Create button.

- Confirm charges for this operation on the next pop-up.
Managing the Hunt Group
You can manage additional parameters of the Hunt Group that you have created.

- Change the Name.
- Change the Extension
- Assign new or unassign Phone Numbers.
- Change the Ringing Order for agents assigned to the group.
- Change the Time zone for the Hunt Group.
- Change the Location for the Hunt Group.
Depending on Ringing order chosen, you can adjust the following under Callers and Agents:
- Max callers on hold: The number of callers who may wait on hold for an agent to become available to take the phone call. When the max callers are holding, additional callers hear a message, which you can choose later under Greetings tab, then they are sent to the Basic Hunt Group timeout destination.
Note: The default value is 30, min — 1, max — 100. - Agent wrap-up time: The number of seconds after an agent ends a phone call before the system routes the next incoming call to their phone. An agent is considered unavailable during this time. This allows the agent to make notes and prepare for the next call.
Important: If an agent is logged into 2 or more Hunt Groups, the wrap time will only be respected by (and known to) the Hunt Group through which the call was received. An agent in wrap status for the first Hunt Group can still receive calls from other Hunt Groups. - Hunt next agent after: The period of time after which the call will be directed to the next agent of the Hunt Group.
- Unanswered idle time: The period of time for an agent to be temporarily removed from the Hunt Group call routing if they do not answer a hunt group call.
- Route group calls to an agent while on a personal call allows the agent to receive a second Hunt Group call if on an active call. Answering this call will place the first call on hold.
If Basic Hunt group timeout is enabled, the following settings become available:
- Timeout: the timeout period in seconds before hunting calls are transferred to other destination
- Timeout to: an alternate destination to route a phone call; the following options are possible:
- Phone Number.
Phone number timeout in seconds: the period of time the external phone you specified above will ring before the call will be routed to Hunt Group voicemail. This option will only appear if timeout is set up to the external phone number.
Note: if you set a long timeout, a call may be 'picked up' by the voicemail of an external number. Make a test call to confirm the routing is working as expected. - User
- Auto Attendant
- Hunt Group
- Voicemail user
- Voicemail: current group
- Voicemail box
- Advanced Hunt Group
- Phone Number.
Menu Tab
With Menu options, you can create alternate routing destinations for use in your Hunt Groups. These alternate destinations may be accessed at any time while interacting with the Hunt Group, such as while on hold before an agent answers the phone call.
Click on the Action associated with the button and choose the destination.
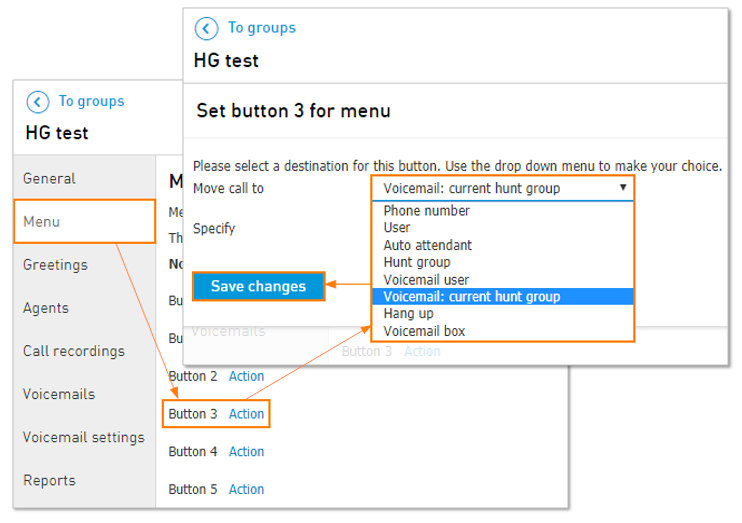
Note: it is important that you mention these routing options in your Initial Greeting, Repeating Message and/or Music on Hold, as your customers will not be aware the options exist otherwise.
Greetings Tab
Greetings provide a method to relay information to your caller. You can set up multiple types of greetings that will play at different times during a phone call into your Hunt Group.
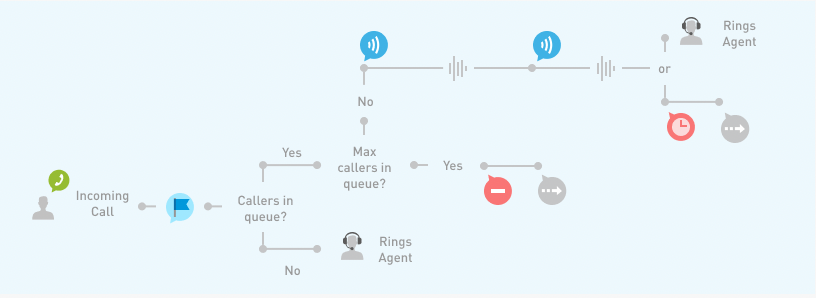
The Call flow example explains when each of the greeting types will be played, during the lifecycle of an inbound phone call. Each location where a greeting can play in a call is denoted with an icon for quick reference.
Types of greetings for the callers:

Types of greetings for the Hunt Group agents:

For additional information on greeting audio file formatting, see: How do I create a *.WAV or *.OGG file for my greeting?
There are following options for the section Music on Hold/Ringing:
- Ringback tone .OGG (default US ringing sound) — always available for selection
- Use company selected Music on hold — selected by default
- Upload new file
Agents Tab
In order to add agents to the Hunt Group:
- Click on Add new agent
- Click the checkmark next to the user(s) you would like to add.
- Click the Add button.

You can also add external phone numbers to Hunt Group:
- Click Add phone number.
- Enter name (optional).
- Enter the 10-digit phone number
Note: You can’t add a PSTN agent to a Hunt Group if the phone number already exists on the account. The existing phone number must belong to a user and that user must be assigned to the Hunt Group as an Agent. - Click Add.

Note: if you add a cell phone number or any number that has an answering service, you must remember to properly adjust the Timeout setting under the Callers and Agents on the General tab.
Important: having the Hunt Group timeout longer than the answering service ring time will result in calls being picked up by the answering service before the next agent can receive the call.
Logging In to or Out of a Hunt Group
Once Agents are added to the list, they are able to log into the group from their VoIP device by using the correct dial code, assigning log in & out buttons to their device, or by an administrator using CONTROL PANEL:
How to log in and out of hunt groups directly from the IP phone:
- To log in the hunt group dial its extension and add '1'.
*XXX*1 (log into a hunt group with extension XXX). - To log out of the hunt group dial its extension and add '0'.
*XXX*0 (log out of a hunt group with extension XXX).
For example, if you need to log into a hunt group with extension 300, dial *300*1. To log out, dial *300*0.
How to log in and out of hunt groups in CONTROL PANEL:
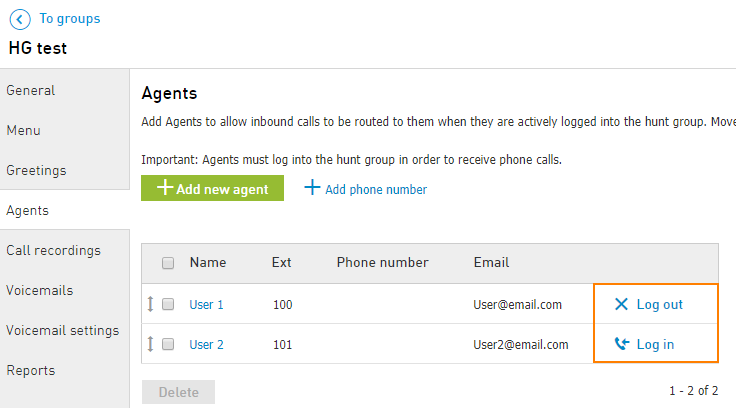
- Click on Log in to make an agent available for calls in the Hunt Group.
- Click on Log out to make the agent temporarily unavailable for calls to this Hunt Group
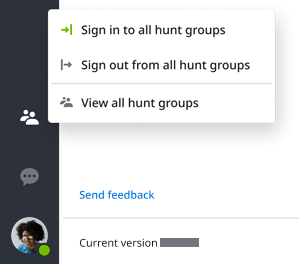
How to log in and out of hunt groups in Elevate Desktop App:
Elevate user who is assigned as an Agent in a Basic or Advanced Hunt Group sees an additional tab in Elevate Settings named Hunt groups. On that tab, an agent can see their assigned hunt groups and can sign in to each group or to sign out from them.
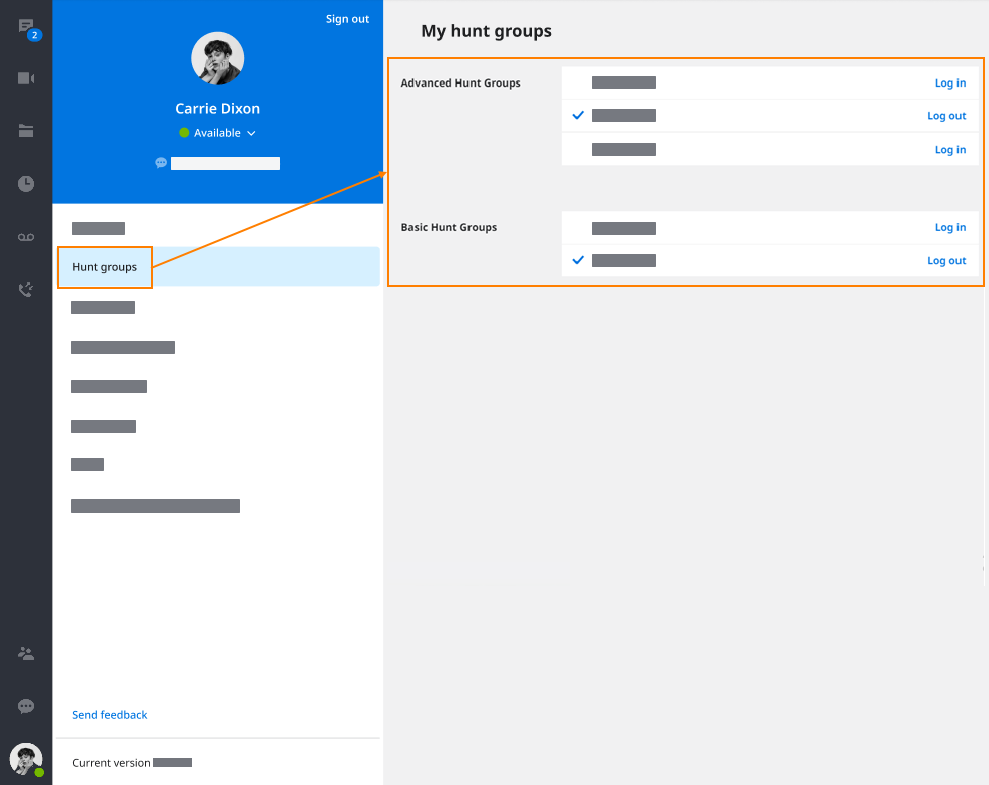
An agent can sign into or sign out from all their assigned hunt groups in bulk using the button on the left panel.
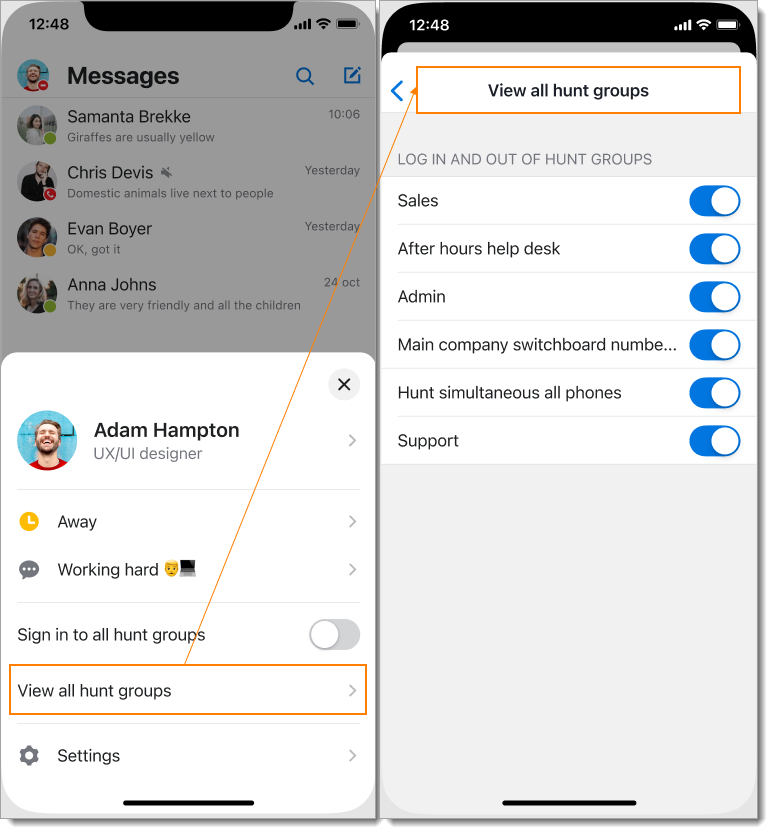
How to log in and out of hunt groups in Elevate Mobile App:
Navigate to Quick settings menu to Sign in to all hunt groups at once:

Or, click View all hunt groups to manually log in to necessary groups:
Android:
Navigate to Settings > Agent Settings

Note: Login to all groups and the list of hunt groups work independently. If the user enables or disables one of the hunt groups toggle, the state of the Sign in to all hunt groups toggle won't be changed.
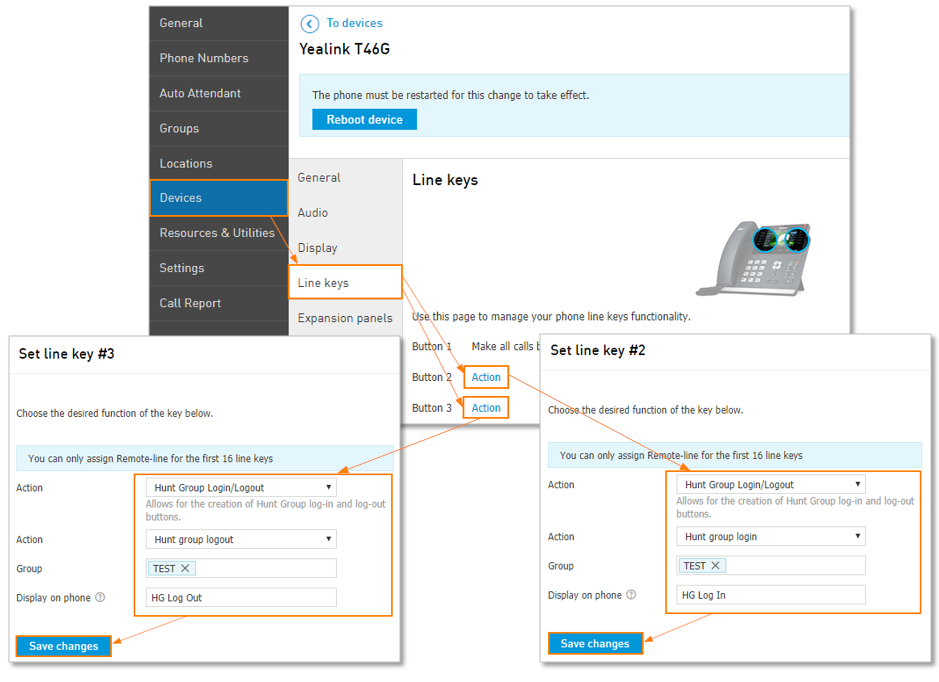
How to assign log in & out buttons to a Elevate provisioned device:
- Navigate to the Devices tab and click the phone you wish to edit.
- Click the Line keys settings tab.
- Click Action next to the button choice.
- Select Work with Hunt Groups.
- Select the Action, either Hunt Group login or Hunt Group log out.
- Select the Hunt Group the agent will log in our out of.
- Adjust the Display on phone to an identifying name that will show next to the button on the device.
Make sure to also assign a log out button to another action button.
Receiving calls as an agent
Once Agents are logged into the Group, any calls that are received will automatically begin ringing to their device in the order of the ring method chosen.
When the Elevate Desktop application is opened, the call bar will display the incoming call with the full Hunt Group name and CNAM:

When the Elevate Desktop application is minimized or not the focused application, the incoming call pop-up window will also display both the full Hunt Group name and CNAM of the caller:
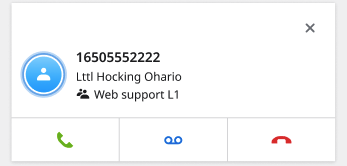
When receiving calls from hunt groups, the Caller ID is modified to append the group name to the end of the Caller ID name (or 'CNAM') field on the display of your phone, to allow agents to quickly identify where callers are being referred from; this is very useful for agents that fill multiple roles and are in 2 or more groups.
The Elevate system accomplishes this by:
- Capturing the first 10 characters from the caller's original Caller ID name. (example: CNAM: ACMEWarehouse = ACMEWareho)
- Capturing the first 10 character from the Hunt Group the call was received on. (example: Hunt Group Name: CustomerSupport = CustomerSu)
- Add ',' between the entries
- Inbound Caller ID Display Result: ACMEWareho, CustomerSu 6503551212
Voicemails Tabs
Voicemail settings
Voicemail settings tab provides the ability:
- To listen to and to upload the voicemail greetings for the Hunt Group.
- To reset the voicemail PIN for the current Hunt Group.
- To set up the Operator Number that allows a caller to touch 0 to reach a live person after being routed to this voicemail box. You can specify operator destination as an extension or a specific phone number.

- To enable/disable auto-delete settings for voicemail as well as set up after how many days you would like your voicemails to be autodeleted.
- Maximum storage for the voicemail is 50 Mb regardless of the storage time.
- Voicemails can be stored for maximum 365 days.
- To enable/disable voicemail transcription.
- To adjust voicemail notification settings.
- To enable/disable SMS notifications for a specific number.
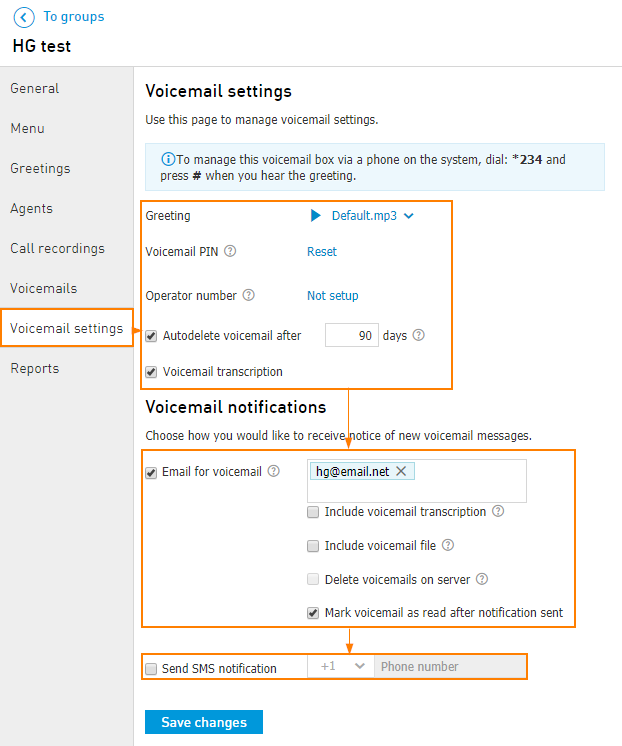
Note: you can forward the call directly to the hunt group's voicemail or reach hunt group's voicemail by using * + <HG EXT> (e.g.: *100 if 100 is the hunt group extension)
Checking voicemails
There are 3 available options to check voicemails:
- In CONTROL PANEL
Navigate to Services > Elevate > Groups > Select the hunt group > Voicemails

- Via Email
If the email notifications are enabled, then all the voicemails should be forwarded to the specified email address. - From the remote line
- To access hunt group voicemail directly dial ;* + <HG EXT> (e.g. *100 if 100 is the hunt group extension) and press #
- Enter HG EXT when prompted, press #
- Enter HG VM PIN, press #
- For more options of Voicemail management read the Knowledge article: How Can I Check My Voicemail?
Call Recordings Tab
From this tab you can manage your recorded phone calls as well as set up notifications for it. You can search the call recordings by the number or agent as well as specify the search period.
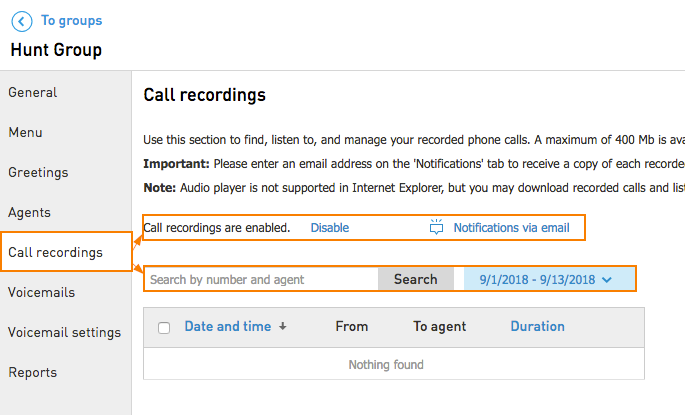
You can enable/disable call recording by clicking on Enable/Disable
Notification via email allows you to add an email address for the call recordings notifications.
Note: audio player is not supported in Internet Explorer, but you may download recorded calls and listen to them.
Call recording storage information:
- Each Hunt Group may store up to 100 hours of Agent call recordings.
- A warning email will be sent to the customer when storage reaches 80%, 90% and 100% of capacity.
Important: Once capacity has been reached, older call recordings will not be overwritten, so the storage will need to be cleared out. Additionally, when capacity has been reached, and a new call is recorded, it will not be stored on the account, however, if the customer has the option enabled to email the call recording to themselves, they will still receive that email containing the call recording. - Hunt Group recordings stay in your recording storage until you delete them.
Reports Tab
Reporting allows you to monitor various statistics for Hunt Groups and Agents.
Note: daily report information is stored for the last 3 months; monthly report information is stored for the last 3 years.
To view the reports:
- Navigate to Services > Elevate > Groups
- Click on the Hunt Group name
- Click on Reports.
Choose the date and the agent you wish to view the report for.

You will see different reports depending on your selection.
- Date range — to view Historical call reports:
- Today Monitoring — to view Active call reports:
If you have selected a date range and all agents, you will see:
Hunt Group Report:
|
|
Call Statistics Report:
|
|
On hold time Report:
|
|
Talk time Report:
| |
Call length time Report:
|
|


If you have selected a date range and one agent, you will see:
General Report:
|
|
Calls Report:
|
|
Talk time Report:
|
|
Max time logged in Report:
|
|


If you have selected today and all agents, you will see:
Active calls Report:
|
|
Average call information Report:
|
|
Agent logs Report:
|
|


If you have selected today and one agent, you will see:
Active calls Report per agent:
|
|

Additionally, if you have selected a date range and all agents, you may customize the coloring of the graph by creating a Service Level Agreement (SLA). Once report is generated navigate to Hold time section and click Setup SLA.
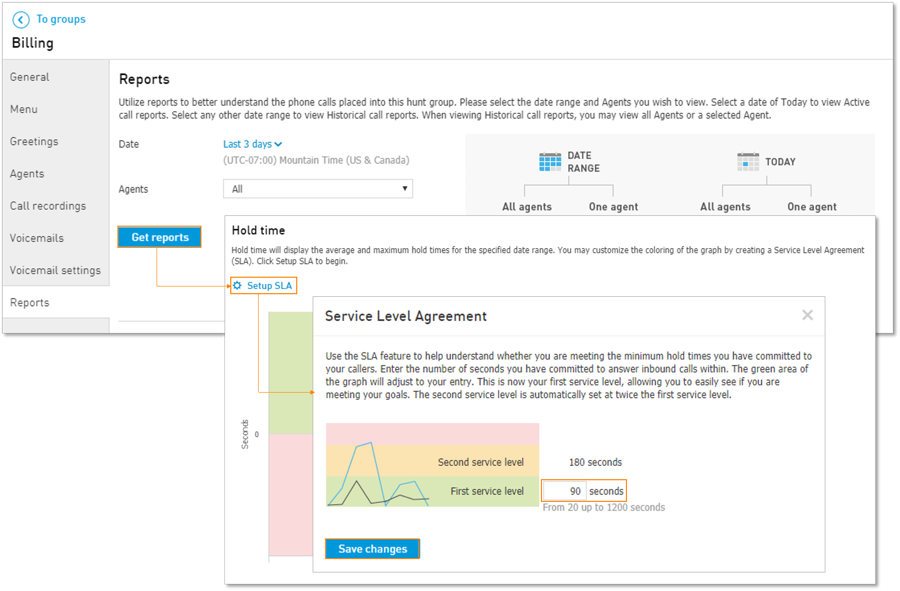
- Enter the number of seconds from 20 up to 1200 you have committed to answer inbound calls within. This will be considered as SLA 1.
- The second service level (SLA 2) is automatically set at twice the first service level.